
The Insider has had lots of articles in the past issues that discussed how important communications are for safety and information. Here we’re going to talk about how to have communication even if you have to bug out. What we are talking about is a HF capable radio, not your handheld radio for tactical communications.
Why?
Why should you take a HF radio with you? If you have a place already set up as your bug out location then ideally the HF communications equipment should be set up or at least stored there. Unfortunately, not everyone has that or maybe they don’t have everything there.
Another reason to have HF with you and not just stored somewhere is so to be able to reach out further than your handhelds. If you recall from other articles a handheld radio is going to be 5-8 watts depending on your location and what is around. You might be able to transmit up to 10 miles simplex with a ladder-line J-pole antenna up 10-20 feet but that’s greatly reduced around buildings, trees, etc. The other disadvantage with using VHF is that it is very easy to direction find (DF). HF communications with a Near Vertical Incidence Skywave (NVIS) antenna can be made to bounce off the atmosphere which makes it difficult to direction find.
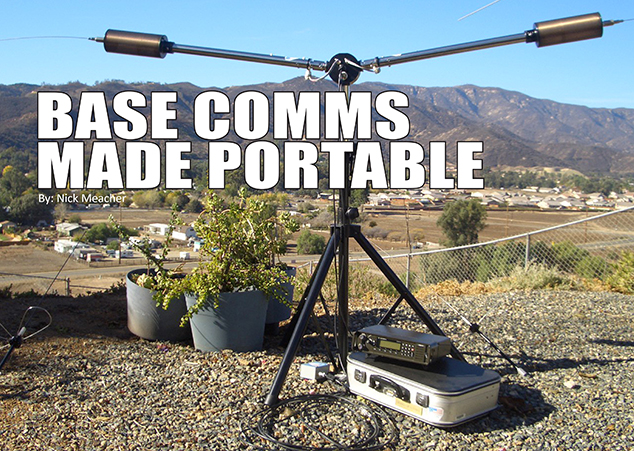
NVIS antennas use low bands and low (horizontal) antennas. Generally daytime frequencies between 5-7.5mHz and night time between 1.8-5.5mHz. Typically to reach up to 350 miles the antenna needs to be about 12-15 inches off the ground. Wire antennas make the best NVIS antennas. If the antenna is placed higher off the ground at about 20-30 feet, the signal will go about 1,000 miles. These communications distances have been seen with as low as 10 watts of power. With a basic understanding of a NVIS antenna we can use even a low power radio to communicate over considerable distances. We’ll discuss more about antennas later in this article.
What Radio?
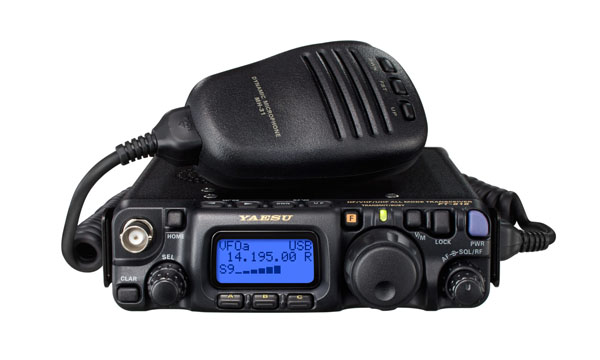
There are few 12-volt mobile HF radios that would be suitable for being carried in a pack or in a vehicle. The Yaesu FT-818ND is a low power (6-watt) radio that has internal batteries and covers 10-160 meters as well 6-meters, 2-meters, and 70cm. The internal batteries are 9.6v 1,900mAh. It operates on SSB, CW, AM, and FM, and is capable of digital modes. It also comes with a battery case for 8 AA batteries. The power drops to 2.5 watts when using the AA batteries. It lists for about $850. This radio is fairly new and replaced the FT-817ND.
The Yaesu FT-891 is a full power, 100-watts radio that covers 10-160 meters and 6-meters. Like the FT-818ND it also operates on SSB, CW, AM, and FM. It will operate at 100 watts but power can be selected from 5-100 watts. Using only the power needed greatly extends the life of the batteries as well as limiting who can hear your transmissions. It lists for about $650.
Obviously as a base radio the FT-891 would be the ideal choice because you can operate at the higher power. The drawback is that it doesn’t have internal batteries so you’ll need to have 12-volts available to operate when packing it. This will add considerable weight. Although if you’re in a vehicle this may not be too much of a concern.
The Icom-7200 is listed as an entry level radio, however it’s ruggerized but not waterproof. It’s 2-100 watts and operates on 10-160 HF and 6-meters. It operates on SSB and CW. It lists for about $820.
When considering what radio to get think about whether you need 2-meters and/or 70cm in a higher power than a mobile is going to provide. I would contend that 2-meters and/or 70cm isn’t necessary in a SHTF scenario. You have hand held radios for tactical communications. The HF has the capability to reach people 100-3,000 miles away. This will be important to be able to hear what’s going on outside of your area.
Protecting Your Radio
Obviously you need to protect your radio as it’s a valuable piece of equipment. It might be your only means to find out what’s going on around the country and even the world. One way is in a hard case such as Pelican, Condition 1, 5.11 Tactical, or other manufacturer.
Some ham radio folks have built very nice portable radio stations in hard cases.
Portable Zero makes protective carriers for a number of radios including the Yaesu FT-817. The carries are a metal frame that bolts where the normal vehicle mounting plate are. They then extend to protect the knobs on the front and the connectors on the back of the radio. For the FT-891 it’s $79.
They also make a pack for the radios as well as a 12v battery case. While the packs may be water resistant, they may not provide sufficient protection in heavy rain. Think about adding additional protection. If you consider an EMP a risk then the radio should be in an EMP proof bag until needed. The larger EMP bags available through Survival Dispatch should fit the radio with the Portable Zero frame attached.
So we have a HF radio and power, next is an antenna. As mentioned earlier, a NVIS antenna is going to be our best option for communications. There are a number of commercial antennas on the market for NVIS communications. These are sometimes called ‘EMCOMM’ (for emergency communications) as typically they require getting a message a few hundred miles out of the disaster area. There are also numerous home made designs with the simplest being made from wire. NVIS works best on 40-meters for daytime and 80-meters for nighttime. A simple NVIS antenna can be made with wire and a balum, such as this one by N6CC.
How NVIS Works
A vertical HF antenna generates a signal that will travel to the natural horizon on the right frequency, typically about 100 miles. An antenna horizontal or parallel to the ground will send the signal up. It will bounce off the F layer and back to the ground. This is inside the skip zone that a typical HF signal from a vertical antenna produces.
The upper range of usable frequency, before it will go through the F layer, is called the Maximum Usable Frequency (MUF). The lower end is called the Lowest Usable Frequency (LUF). The range between the MUF and LUF changes as the sun interacts with the ionosphere, hence the reason we have different bands for daytime and nighttime.
Signals above 10 MHz will go through the F2 layer into space so during the daytime we need to use frequencies between 5-10MHz (40-meters and the channelized 60-meter frequencies). Evening the frequency drops throughout the night to about 2-5MHz before dawn, so the 80-meter band is the best choice.
With an antenna horizontal to the ground the signal goes straight up and bounces back down within 100 miles of origin (diagram a in figure 10 above). If we slope the antenna the angle will determine about how far the signal can be heard.
As mentioned there are a lot of designs on the web for NVIS antennas but bear in mind we’re planning to be on the move. First, we’ll look at a few vertical HF antennas.
The Super Antenna can cover all bands if you get the option 80-meter coil. It packs into a small bag. Vertical antennas need ground radials for the best efficiency and they come with the kit. This is a good, small antenna with a manual tuning card so you can use it without an antenna tuner to tune to the band.
The Alpha FMJ antennas are modelled on the military whip type antennas. The kit shown comes with a tripod for mounting.
Either of these antennas are great because they’ll work on multiple bands. However, we also have to consider if it’s going to be in a vehicle where weight and bulk may not be an issue.
Some of the wire designs copy the military AS-2259/GR antenna kits. These use a mast about 15ft high and then two sets of antenna wire. One length is optimized for 40-meters and the other 80-meters in an inverted ‘V’ configuration. The illustrations (figures 17-19) show a set up with both 40 & 80 meters. However, on the move just the required band could be set up quickly. Instructions for this antenna, as well as a components list can be found in A Practical NVIS Antenna for Emergency or Temporary Communications by DX Engineering. You’ll find that many of the components needed can be improvised.
If you’re backpacking then just get the wire and improvise the poles, or use a tree limb to suspend the center, or setup as a sloped antenna. DX Engineering has the separate wire kits for 40 & 80 meters for about $45 each. Sometimes you can find the military AS-2259/GR antenna kits at hamfests or eBay but they’re usually expensive. There are also homebrew designs by various hams.
Remember that you need insulators between the antenna wire and the guy ropes as well as tensioners. These can be made from plastic, scrap Perspex, pvc pipe, or other non-conductive material.
The military Radio Communications Field Manual (FM 24-18) contains charts on wire lengths for specific frequencies. Another chart can be found here. You can cut lengths for mid-band and carry them in your Bug Out Bag/radio kit, together with rope/paracord, some insulators, and pegs.
The Chameleon has two wire antennas, but the Chameleon III is designed for a more permanent installation. The Chameleon EMCOMM II is designed for rapid deployment and taking down. It can be configured in most of the NVIS configurations shown in figure 10.
I know a young ham who set one of the Chameleon III antennas up about 15ft off the ground using a tree at one end. He was able to make contacts in Europe, Canada, and Russia from Colorado using only 5-watts SSB voice.
Wire antennas need to be about ¼ wavelength above the ground to be most effective, which equates to about 10-15 feet. Pat Lambert, W0IPL, did some experiments and has some very good information in his article.
Note that he also discusses the use of two ground wires, parallel about 12-inches apart under the antenna wire to improve the signal. This may not be something you want to set up on the move but should certainly consider for more fixed locations.
What we haven’t mentioned yet is the need to tune the antenna to the specific frequency you’re using for the most efficiency. This can be done with a SWR meter and the wire cut to length. If changing frequencies within the band you probably don’t want to do this, see trimming a dipole antenna by Stu Turner N0STU.
Of course, you could tune to the middle of the band and be fairly close. Another option is an antenna tuner. There are a number of different antenna tuners on the market, some manual and some automatic. They are beyond the scope of this article but your local ham store, club, or Elmer should be able to give you some good advice.
HF antennas can seem daunting but the ability to communicate 100-800 miles can be very useful and can be done with less than 10-watts in most cases. The addition of a SignaLink and the availability of a computer running the (free) Fldigi software will allow you to send digital messages. You’ll have allow more detailed and accurate messages. The SignaLink supports RTTY, SSTV, and CW as well as today’s hottest new modes like PSK31, FT8, JT65, WSPR, and WINMOR. They have cables for most radios with a simple pin configuration and you can be on the air with most digital modes. There are several advantages using digital modes.
Firstly, a complete message can be typed ready to go and then sent at the push of a button. Secondly, if you’re using a pre-arranged frequency then the receiving radio can be unmanned but will still capture the message. This is a huge advantage if you don’t want to give your location away.
We’ve discussed this in prior articles, but remember in a true SHTF you need to be aware of communications security (COMSEC), transmission security (TRANSEC), and operational security (OPSEC). You should already have a communications plan (COMPLAN) that includes code words, rotation frequency plan (including code words for specific frequencies), and One Time Pads (OTP).
Just as with many other preparedness skills it’s important that you practice. Obtaining your General class license will give you operating privileges in the 40 and 80-meter bands (and many others). Then you can practice setting up and operating your station.The ARRL holds Field Day where clubs and individuals around the country set up portable stations in parks, fields, and other locations to practice setting up EMCOMM in an emergency.
They do this every year on the last weekend in June. This is a good opportunity for you to see what others are doing. You can locate local groups at the ARRL’s web site. Or your group can set up its own field day to practice set up and group comms. In fact, as part of your regular group training you should have a comms training day as part of routine.
As mentioned, I strongly encourage you to get your General class license. Practice with HF to gain better skills, an understanding of what you can do, and how far you can communicate with simple NVIS antennas. For free study guides, flashcards, and practice tests go to hamstudy.org. To find FREE tests near you go to LaurelVEC.com
I strongly encourage you to look at some of the other references to learn more on NVIS. I’ve tried to simplify the information in this article but there is so much more to understand. The book Near Vertical Incidence Skywave, Theory, Techniques, and Validation by David Fielder is probably the best single resource. It’s out of print but you can sometimes find used copies available on Amazon.