
In today’s era of firearms and technology, it seems like there is a round or app for just about every problem most people come up against in daily life. However, as a regular reader of Survival Dispatch, I know you see things differently.
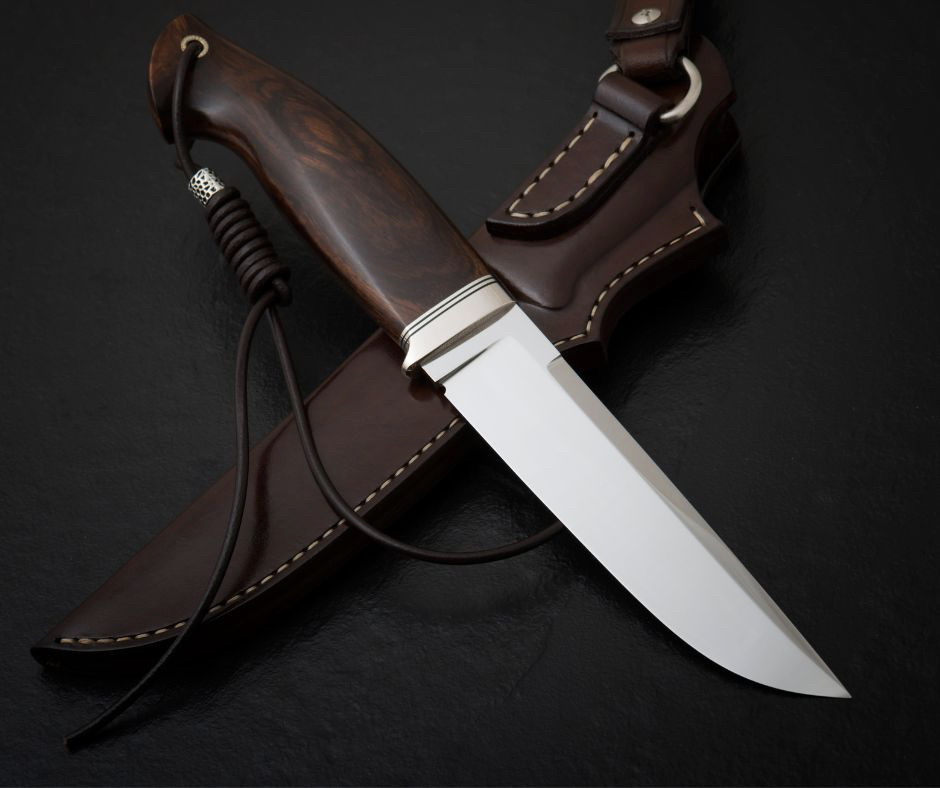
You know how to utilize the resources of the land and how to use them to sustain yourself over the long term. That being said, one of our most important tools in any situation usually lies on our belt line, our survival knife.
We rely on a sharp edge to help us get through the worst with nothing but our wit and skills, but over time that edge can dull from use and need some help.
Some background.
Those who read our article on ItsJustsharp.com (https://itsjustsharp.com/2022-12-08-how-do-i-sharpen-my-multi-tools-) about sharpening multitools know my love affair with knives started young. I still keep the red-handled swiss knife on my hip along with the pocket knife I received from my father the day I graduated from U.S. Air Force basic training in texas. I view them as an extension of my abilities and they’ve seen use all over the globe during my time as an Air Force Loadmaster.
When I was growing up, the internet wasn’t nearly as fast as it is today. I’m happy to be a part of the club that knows what the internet sounds like coming over a phone connection. That to say, there wasn’t a readily available database at all times of how to care for the knife I was given. When my grandfather gave me the first knife, he also gave me a small rectangular rock to sharpen it. I knew that this whetstone was my path to keeping it sharp, but had no clue how to use it properly sharpen.
I’ve spent the last several years mastering taking care of these tools and I love to use the term “knife therapy” when I spend time getting them back into a fine edge. So what follows is my sharpening process for caring for any edge.
Quick Note: This is a guide and is not all encompassing.
Now for the required statement. Knives are dangerous and should only be handled by sober, competent and responsible adults. This is a general guide and is not meant to be a catch-all for any and everything that could go wrong. Do not handle any dangerous, hazardous, or otherwise harmful equipment without the proper safety gear and without professional guidance. Sharpening knives could result in injury. This article is for entertainment purposes, as such itsjustsharp.com bears no liability for any injury or damage cause by/to you during the process. Also, waters wet, don’t run with knives, and we all know about Ralphie and his air rifle, the moral of the story is to be an adult.
Checklist: C-U-S-H-P.
For better or worse, my military training relied heavily on acronyms and it’s become ingrained in me. As a result, I created Its Just Sharp’s CUSH-P checklist to help as an easy guide to help you through the process.
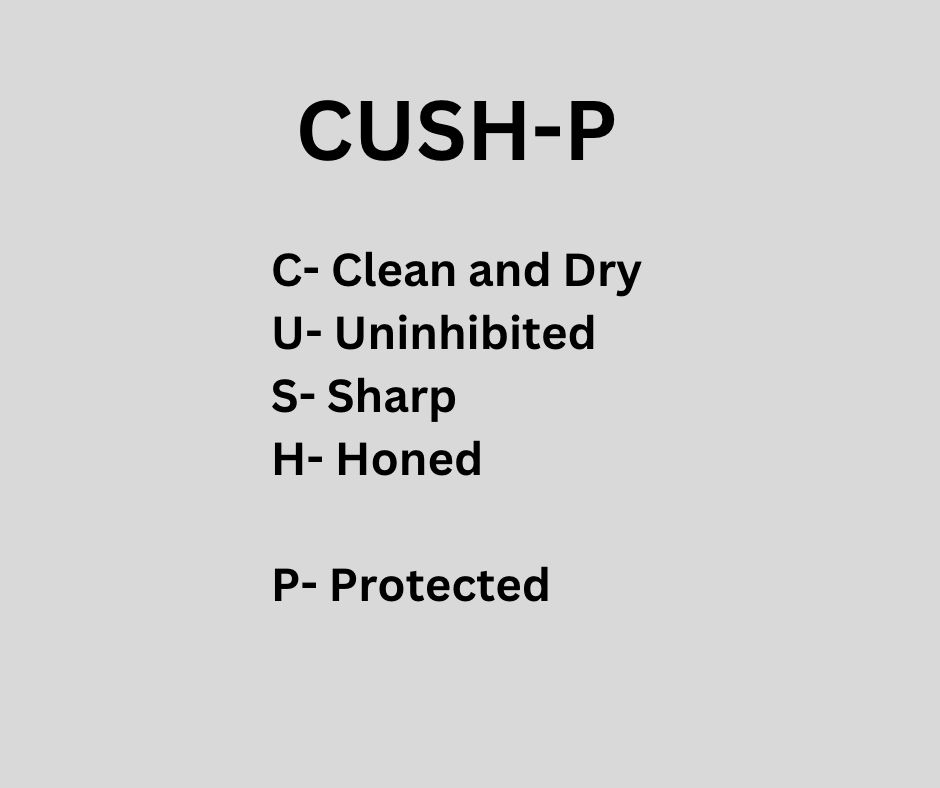
C: Clean. Knife sharpening always starts and ends with a clean knife.
No matter what kind of cutting edge you’re working with, I always recommend starting with a clean knife. I always clean a knife with a safe scrubber over running water and use as little soap as I can get away with.
As you remove any sticky substances, tree bark, tape or otherwise you’ll be able to get a better view of the overall condition of your knife. I’ve seen it where a small amount of tape was inside the handle holding a small rock.
Over time the rock had started to scratch into the blade and it began to rust. However, due to being in the field, there was a layer of sap on the blade covering the scratch.
We had also noticed in the field that the knife wasn’t closing correctly, only to find the rock was to blame. As the knife was cleaned we were able to remove the rock and fix the issues.
So, Checklist Item #1. Always start with a fully clean and dry knife and handle!
U: Uninhibited Movement. Is your knife moving as it should?
Having proper movement is absolutely crucial to ensuring that the knife is able to perform at its peak regardless of how sharp it is. Key areas that I check are:
- Does the blade move freely from its sheath? For a fixed knife blade, this is as much about the knife as it is the sheath. If there are snags or problems holding or removing it, further investigation is warranted. For folding blades, I want to make sure that the blade moves correctly between open and closed positions. Issues in the movement could mean loose screws holding the edge intact or something could be preventing the knife from locking open. Both should be investigated further by a trained pro.
- Does the edge move smoothly across the material being cut? What I’m looking for here is burrs or damage to the blade’s edge itself. If you originally bought a straight-edge knife, and it now looks like a serrated blade, the next step is going to take longer to complete. A common way to test for this is by cutting paper. Running the edge across the side of a piece of paper, any burrs will cause tears to appear on the paper as you cut.
S: Sharpen. It’s time for everyone’s favorite part!
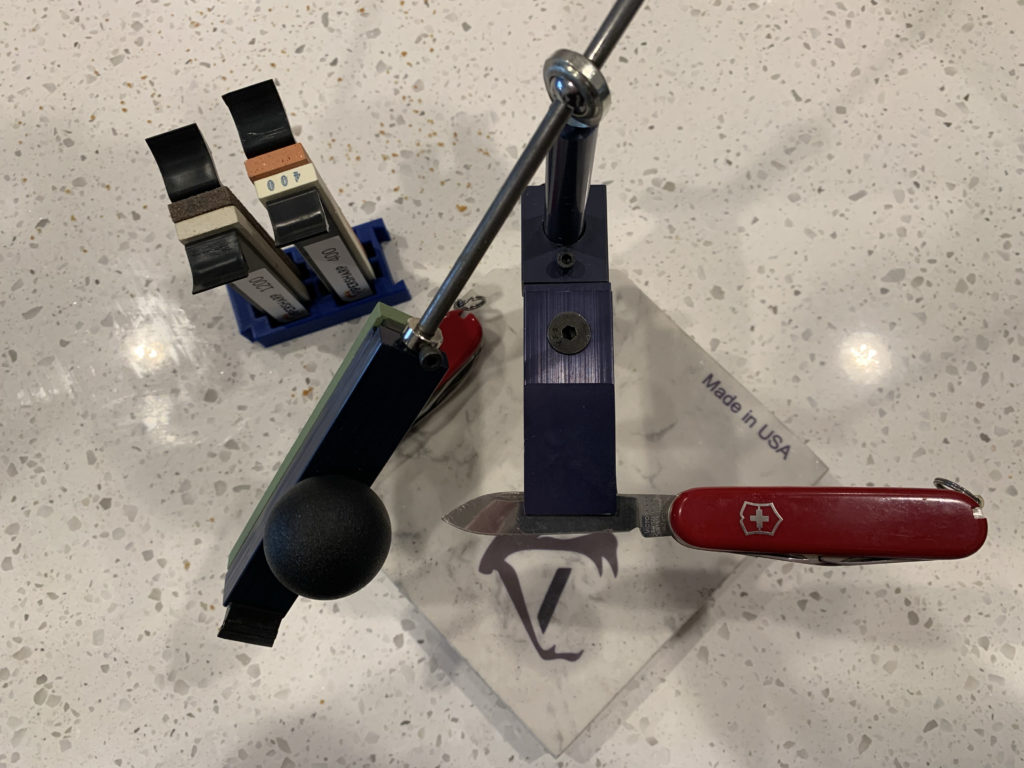
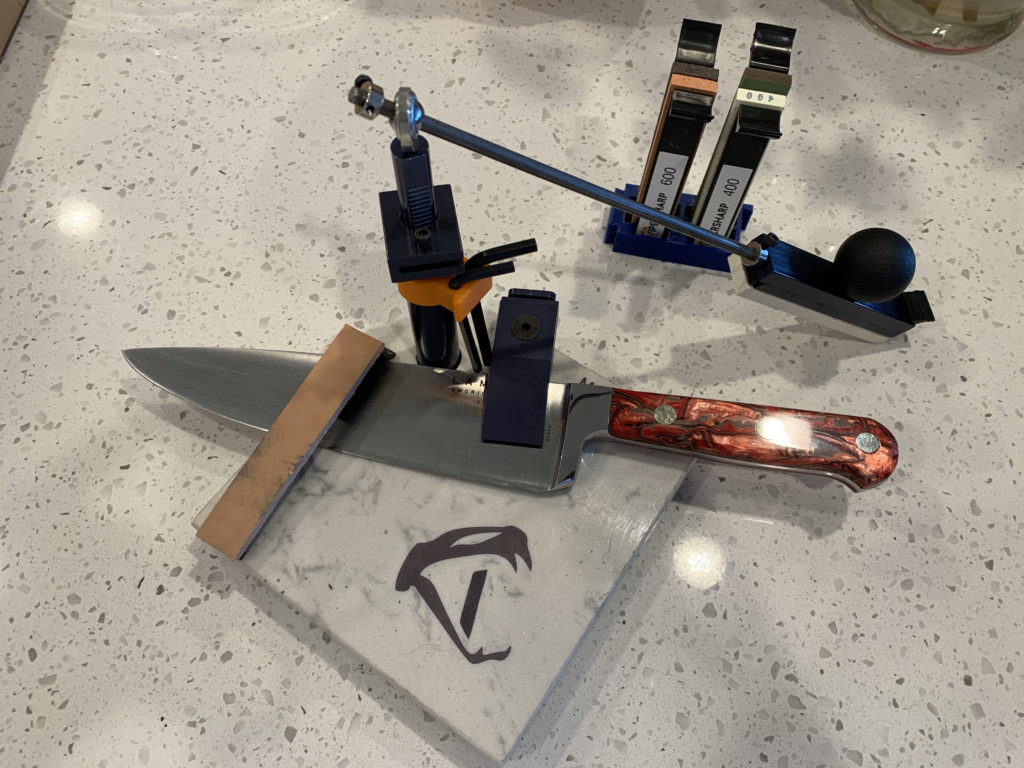
The basic process of sharpening a knife is fairly simple regardless of what you’re using. You’ll need some sort of sharpening stone or sharpening steel rod.
Stones are by far the most common sharpening material out there. I’ve gone much more in-depth in our article at ItsJustSharp.com (https://itsjustsharp.com/strugglingwithsharpeningstones) called sharpening stones so I won’t go into deep detail here.
Note: Sharpening irons and Honing steel.
In another life, I was trained as a chef. I’m familiar with sharpening steels and honing irons, but those are better suited to a kitchen knife. Even with my kitchen knives I still prefer a more stable fixed-angle sharpening system. When I was going through culinary school, I had an instructor show us how to use the rods and then the fixed angle system he used. I’m proud to use the one he did, and I recommend it to anyone who listens.
How to sharpen a knife.
The basic process to sharpen your knife consists of mainly two key parts. The first is to use the correct angle, and the second is to use the right stone.
The right angle is the key to a sharp knife.
When the knife is being forged, a certain angle is applied called the bevel angle. That bevel angle is set based on what the maker believes the knife will spend the majority of its life cutting. The vast majority of knives have an overall bevel of 30 degrees or less. As you run the edge of the blade across the stone you will need to match the same angle as it was originally. I have a further break down in the article here (https://itsjustsharp.com/sharpeningvshoning)
I receive messages from beginners claiming they’re using the correct angle but their knives are still dull or getting duller. This is due to one of two issues. If this is you and you’re seeing fresh scratch marks outside of the edge of the blade you’re working with, its likely that you are using the wrong angle.
I don’t recommend using the eyeball method or the permanent marker method. These two methods are largely guess and check, which can result in more damage than good. Instead, I recommend using a small level. This way when you input the knife into the clamp on your sharpener you’ll be able to set the sharpening arm and have a consistent angle to sharpen with.
It is possible to use sharpening stones without the rest of the system however it requires a lot of practice and muscle memory to keep a consistent angle. If you sharpen knives consistently then this can be learned, but even I don’t use it often except for nostalgia’s sake.
The right stone for the knife blade.
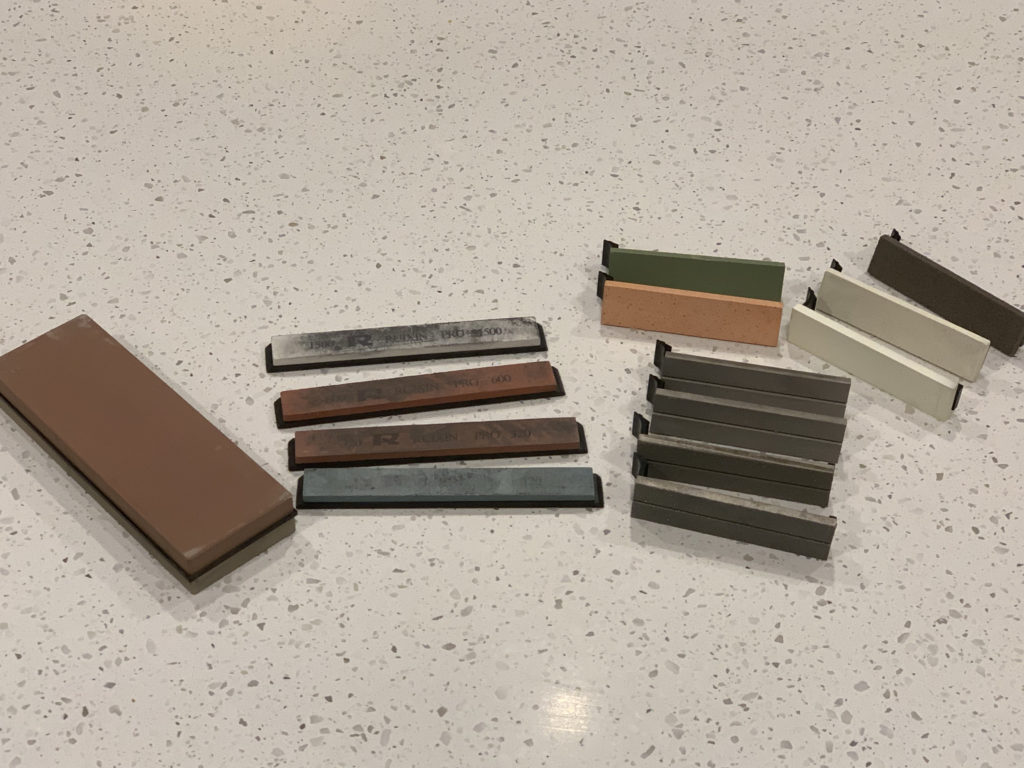
The second major piece to the sharpening process is to use the right sharpening stone. If you’re not familiar with them, these stones work on knives like sandpaper works on wood.
Coarser stones are a lower grit and will take off more material and be more aggressive. I use them most in removing burrs or an extremely dull knife. The low grit stones like an 80 or a 120 does the majority of getting the angle set correctly. When I find knives with two different angles on the bevel, the culprit is usually someone who was too aggressive with a low grit stone and the wrong angle. With low-grit stones, it is easy to change the entire bevel angle if you aren’t paying attention!
As you continue to sharpen you’ll move up grit levels to a finer stone step by step. The goal here is to make the edge cut more smoothly as you go and bring the knife’s blade to a much finer point.
Note: As you get to a sharp edge, you may notice metal shavings.
As you get your knife sharp, you may start to notice metal shavings showing up on the floor or table where you’re working. As long as you’re not using too much pressure, this is completely normal. In this step, we’re working on sharpening and not edge retention. I will cover that in the next step.
H: Hone. Your knife probably needs honing more than it needs sharpening!
When I was first getting started learning about knife upkeep, I thought that the vast majority of the time you simply worked the blade across the stone and moved on. Little did I know that I was missing 80% of the process.
To get any edge into tip top shape and keep it there requires more than just knife sharpening. Due to how thin some knives are on the edge they can start to roll over after use. This is something completely normal, however, it doesn’t require more time with a stone. In this case we just need to take a moment and hone the edge back into alignment.
If you ask anyone who uses a straight razor (myself included) their favorite honing tool is a leather strop. Strops have a coarse side and a flat side. You apply compound to the strop and run your knife back and forth across the taught leather. A thinner knife like the one on a multitool may need more stropping than a full-length survival knife due to its thickness.
If you have a professional knife sharpener, more than likely there is a strop attachment that fits into the stone carrier that will allow you to quickly swap from sharpening to honing without having to move the knife.
P: Protect. Ensure that your sheath and storage are strong enough.
Now that you’ve gone through all this work to get your knife edge razor sharp, you must protect it and yourself! This ties back to the very beginning when we talked about having the knife and handle clean and moving correctly from its sheath.
At this stage of the process, your blade’s cutting ability is at its peak. That also means it’s at its most vulnerable, to dulling from not being protected in its sheath or vulnerable to cutting you!
Make sure you protect your knife in a strong sheath that covers the entire length of the knife blade. If you’re using pocket knives, then fully fitting in the handle works fine. This same principle applies to any other tools you’ve been sharpening!
I hope that this process helps you to keep your most important tool in top condition.
I know that this process takes a while to master, and its something that took me a while to learn to do. I spent many hours curled over a stone trying to learn how to hold my wrist just right to get what I needed. I hope this helps you skip past all those hours of trial and error to get the edge you want.
FAQ
- Q: What about a pull through sharpeners?
A: Pull through sharpeners are a very safe method of sharpening knives, most are cheap and have a single set angle which usually isn’t what your knife is. They also only have one grit which makes it expensive to go to a finer grit. Finally I don’t recommend anything that has you drag a knife that close to your hand. - Q: How can I hone in the field?
A: If you’re in a survival situation its unlikely that honing will cross your mind, however I have used an old leather belt that I used to wear to help me hone like a strop in the past. Be incredibly careful and only in the direst circumstances! - Q: I heard about people sharpening knives with a ceramic dish?
A: I’ve been watching this pop up for whatever reason out on the internet. People have been trying to get their knives sharp using a ceramic mug. I do NOT recommend this. If you have the ability to get a mug to sharpen your knife, then you have the ability to grab your sharpening system. Sharp knives come from using the right tool for the right job. - Q: What’s a serrated edge used for?
A: Serrated knives are great tools for very specific uses, while a straight edge is an all around tool. Serrated knives work using a similar process as saws where the majority of the work is accomplished by the serrates or the points of the edge. If you needed to saw through something firm then a serrated knife is better than a straight edge. Serrated edges need a more special sharpening tool that fits in the grooves and helps get the right sharpening angle a normal stone wont accomplish well. - Q: How do I sharpen X kind of tool, axe, etc?
A: For the most part a sharpening system or whetstone can get your tools to the desired sharpness using a similar process outlined above. All that’s usually required is a bit of know-how and a firm grip. I’ve used these systems to sharpen chisels to scissors and more.