
Hey guys! Brian and Terry here with another installment in our Forest to Farm series here on Survival Dispatch. Today we are going to take you through installing a temporary power pole on our property. Before getting started, you will want to check with your local building codes office and power company to make sure you are meeting all of their requirements and also to find out what it’s going to cost you. In some areas they charge you by the foot for underground power while overhead is free. We were very fortunate that, in our area, the power company will go overhead or underground up to 1,000 feet for free. And then they will go up to 150 feet to your residence or building. Obviously, we opted to go underground, haha.
Once you settle on overhead or underground service, the power company has a guide for what you and they will supply for the project. Here is a shot of the page with the requirements for our local area:
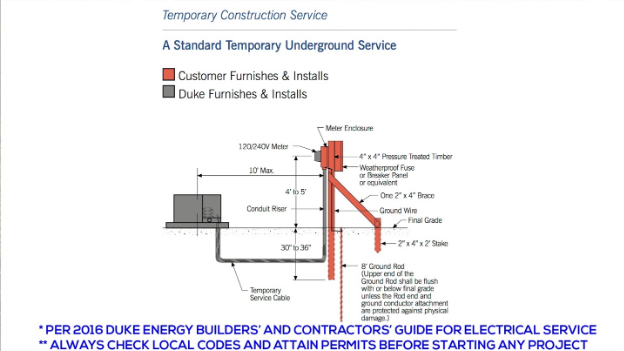
The power company supplies everything in grey and the property owner supplies everything in orange. They want everything on your end complete before you call. That way, when they come out they only have to make one trip to run the cable, install the transformer, and make all of the connections.
Additionally, if going underground, you have to have a 10-foot-wide path cleared for them to drive down with their mini-excavator to dig the trench and lay the wire. If you are going overhead, you have to provide a 30-foot-wide path for them to get in and set poles using large trucks. This path, for both methods, has to start at the nearest power connection (be it overhead transformer by the road or transformer on the ground for underground service) and terminate where you want your transformer located on your property.
When getting started, it’s always helpful to have the proper tools. So, aside from the constructed temporary power pole, you will need a brace for the pole, stake for that brace, a ground rod with a grounding nut to secure the ground wire, a set of posthole diggers, a shovel, and something to tamp the dirt back into the hole to help solidify the pole in the ground.
When it comes to the posthole diggers, we have used several versions over the years in our electrical contracting business. We have found the Fiskars Steel Posthole Diggers that are 60” tall to be the best ones. They are a little price at nearly $100, but if you dig many holes, they are worth it! The way they are designed with the pivot point layout allows you to dig deeper holes with ease and without having to spread your arms 5 feet wide to close them. Also, they are all steel construction. So, they don’t flex or give when working them hard. We have had this set well over 10 years and used them hard. Definitely a great investment!
For a shovel, we find that a simple trenching shovel does a great job because it makes it easier to direct the dirt into the hole where you want it. A standard shovel will work as well.
When it comes to tamping the dirt in the hole, we have tried a variety of items. The problem with trying to tamp is that you are digging a hole not much bigger than the 4×4 post you are putting in the ground. So, what you use needs to be slender and sturdy. We happened to be on a job one day and the contractor was throwing away some replacement handles for a wheel barrel. They were brand new, but he had decided to just replace the whole unit. So, we got the handles and it turned out to be a great idea. The small rectangular form factor allowed us to tamp dirt right alongside the pole all the way around it, unlike struggling with a round pole for tamping. Now it is a far more efficient process with a sturdier end result.
Now, when you start digging, depending on your soil…prepare for some work! We have hard red clay here in South Carolina and it is unforgiving during the hot dry summers. As you dig, it crumbles into a power that is a nightmare to pull out of the hole. All you guys up north are lucky with your rich deep topsoil, haha.
As you dig in hard soil, the posthole diggers will want to close in on each insertion. So, your hole will start to taper inward the more you dig. This is where that trenching shovel really shines. You can use it to shave the tapered sides back to where you need them to do the job properly.
When you set the pole in the hole, keep in mind that generally speaking they want the meter to be facing the road side.
As you fill the hole, try to keep the pole plumb (level vertical and side to side) and fill evenly around it as you tamp. If you tamp one area constantly, it won’t settle properly and could become loose or pushed to one side as you tamp. Also, try to avoid letting any debris or rocks from getting in the hole as you fill it. It won’t pack well, and the pole could become loose over time.
Another tool we’ve found to be very handy is the Irwin Marathon hand saw. It’s under $20 and very sharp. When cutting your stake, you want to cut the bottom at a pretty sharp angle so that it will go into the ground with ease. The squarer it is, the more difficult it will be to drive into the ground.
When you go to set up the brace and stake, we find it best to set the brace where you want it, at the angle you want it, but don’t attach it yet. If you attach it first and then drive your stake, you could run into problems. You can’t see what’s in the ground and your stake may twist, turn, or lean as you drive it. So, get a rough location of where you want your stake, drive it, and then mount your brace.
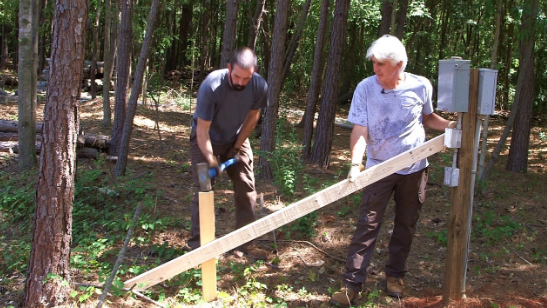
When driving your stake, take your time and don’t try to kill it. Just go steady and take your time. If you drive too hard, you can end up splitting the stake, like I did, haha.
When it comes time to mount your brace and stake, there are a couple options. We started using 16 penny nails. This is the less expensive method and pretty quick. However, the shock of the hammer hitting the nail/pole can work it loose in the ground. The last thing you want after all that hard work is a pole that wobbles. We have opted for using an impact driver and 3.5-inch coarse thread screws. This is a very efficient method and works very well. We just use standard screws, like drywall screws because this is a temporary setup, and they will last years as they are. There’s no need for expensive coated specialty deck screws.
When driving the ground rod, again take your time. It will go much easier than the stake since it’s only ½” diameter. Then, attach your ground wire using an acorn nut and you’re good to go! You are now ready to call in for a pole inspection/power release and then just wait for the power company to hook it up.
We hope you guys enjoyed this post and found it helpful for when you go to tackle a project like this. Check back soon as we make more progress on the property. Thanks for stopping by!