
Survival Dispatch News has moved!
Subscribe to our RUMBLE channel

For those who regularly enjoy the rich and complex flavors of smoked foods, you already know delicious they can be. But did you know that the technique of smoking food has more to do with food preservation than it has to do with taste? Exposing food to smoke can certainly improve the flavor of the food and change the color, but the things that really matter are the drying action of the smoke and the numerous antimicrobial compounds in the smoke. Smoking has allowed our ancestors to better preserve their meat and fish since prehistoric times, and it still works great today. Here’s how you can join this age-old tradition.
Up In Smoke
Smoke is the result of incomplete combustion, often created by attempting to burn tree bark, damp wood or pieces of fuel that are too big for the amount of heat your fire is producing. It’s also important to note that all smoke is carcinogenic (a cancer causing agent). But despite that unappealing health hazard, smoke can create wonderful flavors in food, and it can make your food last much longer than the same food that was not bathed in smoke.
The chemical constituents in smoke are numerous and diverse. They will also be a little different based on the different fuels you might burn. In general, compounds like formaldehyde, phenols, carbonyls, acetic acid, other organic acids and wood alcohols float up through the smoke. These compounds create the signature flavor of smoke, and most of them show antimicrobial effects. This means that smoke is antibacterial; it also prevents fungal growth; and it can even inhibit viral activity.
Many common food-borne pathogens like Listeria monocytogenes, Salmonella, pathogenic Escherichia coli and Staphylococcus are killed or weakened by these smoky substances. Of course, our ancestors had no idea about microbes or the chemical compounds that kill them. The old timers just observed cause and effect. Smoked meat and fish didn’t turn rotten as quickly or make people sick as often as air-dried meat and fish.
Pick A Method
There are two main ways that foods are smoked, with a hot smoking process and a cold smoking process. You can do either process on the same food, with the same smoke – the only real difference is the amount of heat that accompanies the smoke.
COLD SMOKING Cold smoking happens when you force cool smoke into an enclosed area with the food for several days, up to one week. This method is performed for long term food storage, and it’s really more of a drying process than a cooking process. The temperature should never exceed 100F inside the smoker (since this would actually cook the food).
HOT SMOKING Hot smoking involves more heat than cold smoking, enough heat to actually cook the food. With this style of smoking, you’ll use a closed area to hold in the smoke and the heat. For example, if you turned a shed into a “smoke house,” you could burn your smoke producing materials inside the building to generate temperatures in excess of 150F. The heat cooks the food and opens up the tissues for a faster smoke absorption (than cold smoking).
The food is cooked by the heat and flavored by the smoke. Salt cured hot smoked fish, pork, sausages, fowl and red meat can last a week or more at room temperature – and the work of hot smoking can be complete in one day.
Plan For Success
You’ll need two things (besides your food) to do a hot or cold smoke process. You’ll need an enclosed space to hold your food and smoke, and you’ll need smoke producing fuels.
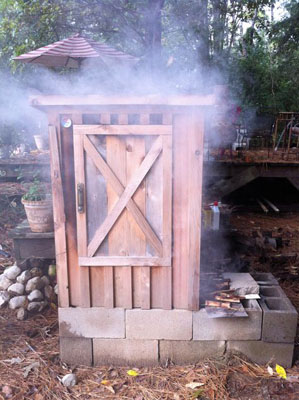
The Box
A smoke box can be almost anything. In colonial times, up until the 1900’s in rural areas, smoke houses were common fixtures on American farms. These were simply sheds that were tightly constructed, places where the smoke would stay contained and meat could be hung. The best smoke houses have a stove outside and stove pipes that bring the hot smoke into the smoke house. But, building a dedicated smoke house is a bit much for today’s survivalists and homesteaders, so start with something smaller.
Virtually any box, container or tiny shed can become a smoker. I’ve had happy results in hot smoking using repurposed appliances (like old ovens) and satisfactory results in cold smoking with large cardboard boxes. To use an old oven (outdoors), you simply throw some embers and smoking material in the bottom, place your food on the racks and close the door. For something more elaborate, cut a hole in the bottom of the oven and put your embers and wood in the metal drawer underneath the oven. Since ovens can handle the heat, you could perform hot or cold smoking in this unit.
Simpler still, a giant cardboard box or crate can be used for a fine cold smoker. Set it up on bare dirt by cutting out the bottom of the box or leaving it open on the bare ground. Build a rack that will fit inside the box, or poke sticks or metal rods through the box to make a food rack. Cut a flap in the side of the box for a door, and place a pan of embers and wood chips on the dirt floor inside the box. Replace the embers and wood as needed. As long as smoke is being produced, you’re doing it right.
The Smoke
I usually start a smoking fire by burning a little oak or some other hard wood to create a bed of coals, then I’ll add chunks or chips of smoking wood to create the needed smoke. Today, you can buy smoking chips at many stores, or you can chop your own chips with an axe or machete. Just soak them in water before burning, so they produce smoke instead of flames. Hickory and maple wood are favorites of mine, producing rich flavors.
Fruit woods like apple make a sweet smoke that works well for pork and poultry. Mesquite wood produces a spicy earthy flavor in the smoke, and oak gives a strong and biting smoky taste. If you’re cutting your own chunks and chips, make sure you avoid any local species that are toxic. You’ll want to skip black locust, yew, buckeye, horse chestnut, rhododendron and mountain laurel. It’s also best is you skip the tar producing resinous woods like pine, cedar, cypress, spruce and other needle bearing trees.
Prep Your Meat
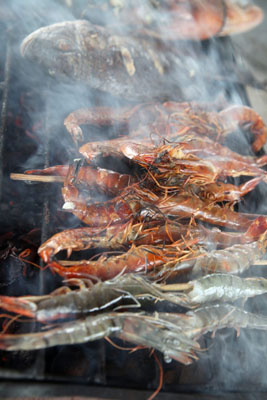
Hunks of meat (such as beef, pork and venison) are usually left whole, making their prep for smoking relatively easy. Hank them on a hook or lay them on a rack and hit them with enough heat and smoke to match your intended product. When preparing fish, your cuts will depend on the type and size of fish. Smaller fish can be gutted and smoked whole, while larger fish should be cut into smaller pieces.
This gives you more surface area and allows the smoke to penetrate deeper into the fillets and cutlets. Cut larger fish, like salmon, into “U” shaped steaks. These “horseshoe” shaped pieces can be hung on hooks or a pole inside your smoker. Medium sized fish can be filleted and left with the skin on, then placed on a rack (skin side down).
Smaller fish, like trout, can be cut along each side of the backbone. Leave the tail attached, but remove the spine and head. This leaves you with two filets, connected by the tail – perfect for hanging up on a rack or pole! Any of these foods can be brined or salted prior to smoking. (And most of them should be, they’ll last much longer.)
Fire It Up
You’ve rigged up some kind of smoke box, cut up your meat and prepared your embers and smoking material. Now it’s finally time to start smoking. Place your embers and damp wood chunks inside the smoker, along with your food. If possible, place a thermometer inside the smoker for occasional temperature readings. Better yet, use a thermometer that can leave the gauge outside of the smoker but put the probe inside.
For example, poke a meat thermometer through the wall of your cardboard box smoker. You can read the dial without opening the box (which would cause loss of smoke and heat). The length of the smoking time for cold-smoked foods will be much longer than hot-smoked foods. Cold smoking is cool enough that the interior food temperatures don’t exceed 100F (at least not for any significant period of time). Keep the amount of embers low, and replace them often for cold smoking.
This is a lot more work than hot smoking, since cold smoking may several days or a week – but it’s best for long term food storage. Hot smoking is done with more embers and a pasteurization temperature is reached, cooking the food. In either case, a combination of salt curing and smoking will be your best bet to create stable food that will last for many weeks at ambient temperatures.
This article was originally published in Survival Dispatch Insider magazine Volume 2 Issue 10.
=====
Become a Survival Dispatch Insider …
We bring together survival enthusiasts and preppers to share skills and knowledge, so you can enhance your preparedness for emergencies and ensure the safety of you and your community.
The Results You’ll Get …
Our community, courses, and memberships are pretty special. We focus on the ways it will make a huge difference in your life.
Here are a few of the things you’ll be able to do as a member of Survival Dispatch Insider …
1) Improve your emergency preparedness by learning survival skills and strategies from experienced preppers.
2) Build lasting connections with like-minded individuals that share your passion for safety and readiness.
3) Access a wealth of knowledge and resources to assist in protecting you and your community during unexpected situations.
Click HERE to get started.
=====