
Get uncensored intel and commentary from Survival Dispatch News
Subscribe to our RUMBLE channel

A blacksmith is a person who creates objects from iron or steel (the “black” metals). This is a trade that dates back at least 3,000 years, and in order to be a modern-day blacksmith (even as a hobbyist), you’ll need the same things our ancestors needed. You’ll have to source some basic tools and build some kind of forge to contain the heat of a fire.
Assemble Your Gear
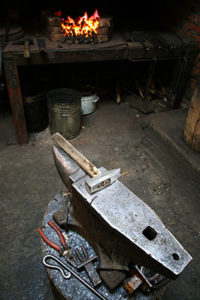
Thanks to popular TV shows, childhood cartoons and numerous movie scenes, we all have the same image of an anvil in our head. But that’s just one iconic style – a very particular kind of anvil. You don’t necessarily need the classic “London” anvil with a tapered waist and a pointy horn. Finding an anvil or some anvil alternative can be the only hard part in setting up your backyard forge. A chunk of railroad track or steel “I” beam can make a nice anvil for many projects. Large cubes and bars of steel and iron can also work well as anvils.
For my classes, we use several anvils that are steel chunks – 3 inches thick, 1 foot long and 8 inches wide. These provide more than enough steel to act as an anvil, and they are more than the first blacksmiths had to use. The earliest anvils were rocks! The point is, don’t get hung up on finding the same kind of anvil you see on TV. It will likely be expensive due to the current resurgence of this craft. And whatever you end up using, make sure it sits securely on a stump or other support, with no risk of toppling over, and make sure it sits at a comfortable height. The face of the anvil (top) should be right where hands would be when you are standing next to it.
In addition to the anvil, you’ll also need a few basic tools. Two or three-pound hammers and long handled pliers can get you started. And you can add in an assortment of blacksmith’s tongs and other tools once you determine what kinds of projects you’ll be doing. Eye protection, hearing protection, gloves and leather aprons are all necessary protective equipment, and thankfully they are affordable.
Stock Some Consumables
What will your forge burn? I prefer to use the same fuel that frontier blacksmiths used – hardwood charcoal. You can make your own by tossing a few buckets of water on a well-established campfire, or building a mud furnace to burn charcoal from raw wood, or you can just buy it. Natural charcoal does burn up fast, and it’s not as hot as other fuels, but it’s commonly available. It doesn’t burn up your metal as often as coal and the price is right. It also burns very clean.
I actually like to cook over the forge when I’m on a break. If you need more heat, you could also track down some bituminous coal. This is much better than the anthracite coal that old fashioned home furnaces burn. Bituminous coal can reach temperatures of 4,000 degrees Fahrenheit under ideal conditions, so watch out! Your hard work can melt in seconds when ignored in the forge (“too many irons in the fire”). Keep in mind that you can even use dead dry wood in a pinch, if you can blow a lot of air into a contained wood fire. I made my first knife years ago with a little cement lined coffee can forge which I fed (constantly) with little chunks of hardwood.
And what steel will you use? Plain old mild steel is available at most home improvement stores and it’s a very forgiving material to work. Get an assortment of round rods, square stock and flat bars in different sizes and you’ll be ready to tackle a wide range of projects.
Build A Forge
All the tools, high dollar steel and fancy fuels in the world won’t help you if you don’t have a forge to contain your fire (but lucky for you, there are several ways you can make one). The two styles that I frequently use in classes are an in-ground pit forge and a trench forge. The pit is my favorite, as it really holds in heat, but it’s not great in wet weather (the pit can fill with water). The trench forge keeps your fire at the ground level, and it’s much easier to heat long objects, but it doesn’t hold heat as well.
Pit Forge
To make a pit forge, drive a two-inch thick stake (about 2 feet long) into the ground at an angle. Wiggle it around and pull it out (to make sure that it will come out). Then put the stake back into its hole and start digging a small pit that will intersect with the bottom of the stake. When your shovel hits the bottom of the stake, clean out the hole and you’re almost done. Pull out the stake, pipe in airflow from a hand crank blower if you’re off the grid (or shove a hair dryer in the stake hole if you have power). Place some tinder and kindling in the bottom of the pit, add charcoal and light it. Start pushing air into the pit and soon your forge will be roaring.
(A dirt oven is made similarly.)
Trench Forge
To make a trench forge, simply line up some fire-proof rocks (collected from a dry area) to make two stone “fences” about two feet long and 10 inches apart. Plug cracks and gaps with mud and run a one-inch steel pipe under one wall in the middle. Attach your blower to the steel pipe and fire it up. For something above ground, I’ve also had decent luck with a small hamburger grill lined with rocks and mud. For air, tape the hair dryer to a steel pipe that is butted up against the air intake at the bottom of the grill.
As you can see, forges are really simple. You just need a place to safely contain your fire and a source of forced air. Get creative, and see what you can invent!
Manage Your Risks
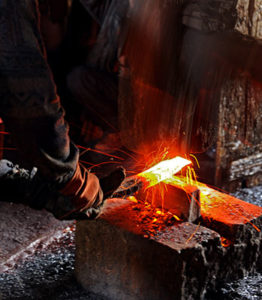
Before you light the first forge or swing the first hammer, you need to know the risks. Forging involves the use of heat and tools to hammer, bend, cut and shape the metal; and all of this activity is inherently dangerous to many parts of your body! Your lungs, skin, eyes and ear drums (among other parts) are at risk. Please use all due caution, wear protective gear and work in a well ventilated area.
HOT STUFF
You’re working with fire and glowing hot metal. Burns are inevitable, but that’s no excuse to work bare handed or while wearing sandals. Wear leather boots, leather gloves and a leather apron while you’re working. You also need to wear cotton, wool or other natural fiber clothing under your protective gear (synthetics are too flammable). Wear eye protection. Steel toe boots are never a dumb idea in the forge. You’re going to get burnt – that’s just a part of this art form – but it doesn’t have to be bad enough to send you to the burn ward at the hospital.
SMOKE UP
Charcoal is the cleanest fuel you can make or find in the field, but it burns up very quickly. If you’re using coal (anthracite, bituminous coal or commercially processed coke) as a fuel source, use extra ventilation. Breathing coal smoke has been proven to be dangerous, and high Sulphur coal can sting the eyes and nose.
THE EYES HAVE IT
Always wear glasses or preferably tinted safety glasses when working at the forge. Make sure everyone watching you work has eye glasses and/or safely glasses on because hot metal and scale will fly in many directions. Never look into the fire when white hot unless wearing protective shaded glasses.
CAN YOU HEAR ME NOW?
The sound of the anvil ringing has been likened to a singing voice, but it is not good for your hearing. Always wear earplugs. Metal workers commonly experience some hearing loss due to hammering metal on the anvil. Try putting a magnet on the side of the anvil to help deaden the ring; the more bottom surface that sits on the block/stump helps. You can also mount your anvil on a lead sheet, piece of leather or silicone caulk before tightly fastening it to the anvil base. A chain around the waist of the anvil that is used as part of the fastening system will help.
THE ONLY FREE CHEESE IS ON THE TRAP
Be very careful if you decide to work unknown scrap metal. The price may be right on scrap metal (a few pennies per pound, or completely free), but certain alloys and treated metals will release poisonous fumes. “PawPaw” Wilson, a beloved blacksmithing mentor in North Carolina, died in recent years after heating up some galvanized scrap metal in his forge. Zinc plated metal releases zinc fumes (which are also toxic). Never heat galvanized metal or metal with a bright finish in your forge.
The fumes from these coatings are very toxic and it can even contaminate your equipment. Old wrought iron work may have lead paint on it as well. The best advice was given by Master Blacksmith David Tucciarone (“If you don’t know what it is – don’t forge it”). Understand that even mild steel has manganese in it, which has been linked to Parkinson’s disease. So make sure you work outside in fresh air – and be careful!
Do Your Research
Blacksmithing has enough subtleties and complexities that you could spend the rest of your life and not master them all. To save some of that painful learning curve, you can study with local smiths and read up on the subject. Some of my favorite books on the subject are Edge of the Anvil by Jack Andrews (helpful metallurgy info), The Black Smith’s Craft by Charles McRaven (nice beginner book), The Home Blacksmith by Ryan Ridgway (great pictures) and The Art of Blacksmithing by Alex W. Bealer (excellent historical reference). These books provide a lot of information and can help you take the next steps in the art of “heat, beat and repeat.”
This article was originally published in Survival Dispatch Insider magazine Volume 3 Issue 1.
=====
Become a Survival Dispatch Insider …
We bring together survival enthusiasts and preppers to share skills and knowledge, so you can enhance your preparedness for emergencies and ensure the safety of you and your community.
The Results You’ll Get …
Our community, courses, and memberships are pretty special. We focus on the ways it will make a huge difference in your life.
Here are a few of the things you’ll be able to do as a member of Survival Dispatch Insider …
1) Improve your emergency preparedness by learning survival skills and strategies from experienced preppers.
2) Build lasting connections with like-minded individuals that share your passion for safety and readiness.
3) Access a wealth of knowledge and resources to assist in protecting you and your community during unexpected situations.
Click HERE to get started.
=====