
Hey guys Brain & Terry here! Today we are going to work on attaching our box blade to our tractor. It’s really not a difficult task, but when you’re new to working with tractors and implements, it can seem a bit challenging the first time. So, we thought we’d take you through our process for attaching an implement to the 3-point hitch on the tractor.
The first thing to notice about your 3-point hitch is that the lower control arms are moved with ease. You can move them side to side or raise them up from their current position. The 3-point hitch does not drive an implement into the ground like many people think. Rather, it limits how low it can go. If it does go into the ground (like a box blade would), that is due to the weight of the implement and its design. Even though a bush hog is heavy, it’s designed to ride on top of the ground and mow.
The first thing you need to do is measure the width of the attachment points on the implement you are going to be using and measure the width of your control arms. The control arms will naturally hang at their narrowest point, so measure there, and then spread them out and measure that width as well. If your implement measurement doesn’t fall within this range, you will have to make some adjustments.
Fortunately for us, it’s very easy to make the needed adjustments on our Kubota B2650. We simply had to remove the cotter pin and retaining pin, slide the control arm a little sideways to reveal the next adjustment hole, re-insert the pin and cotter pin, and that side was finished. We simply repeat the process on the other side, and we are good to go. One side note, if you adjust one control arm and not the other, then the implement will ride more to one side or the other. This can be useful if you are needing to work beyond the side of your tractor for things like mowing or tilling. For now, we want to keep the box blade centered behind the tractor, so we are sure to evenly adjust both sides.
Now, measure the distances that your control arms will spread again and see if you fall within the range of your implement. For this, we only needed to adjust one hole to work. Surprisingly, adjusting just one hole gave us the capability to open up many more inches in width.
Next, since the control arms will lift and spread with ease, all you need to do is line up from overhead with where they need to land.
Once they are in place, you may need to make some fine adjustments to get it perfectly aligned. You can move the tractor a smidge or, if you are capable, shift the implement as needed.
Now that things are properly aligned, you can simply lift the control arms, align the holes, and install the pins.
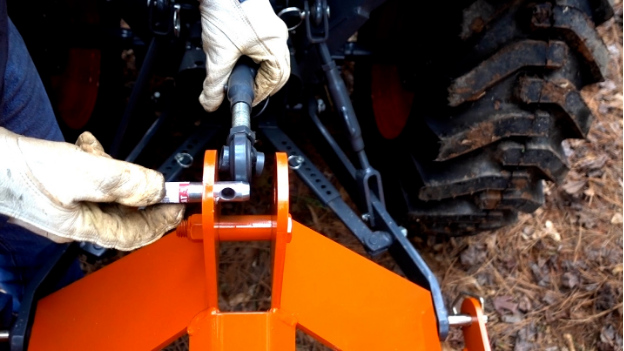
The last thing to connect is the top link. This is the part of the 3-point hitch that controls the angle of the implements. As you can see, ours was falling a little short of hooking up. Fortunately, this is very easy to adjust as well.
You simply hold the ball end in one hand and then turn the linkage in the middle to either extend or contract the top link. If you turn just the ball end, you will only be adjusting half of the link and could throw the system out of spec. The way it’s designed, you have the linkage in the middle with two threaded rods (one on each end). When you turn the linkage, you are simultaneously expanding or contracting the threaded rods at an even pace. Once it’s at the correct length, install your pins and you’re ready to go!
One last note, not all implements have the same spread at the top link connection. As you can see above, the factory pin was not wide enough for use to insert the retaining pin.
So, we went to Tractor Supply and picked up a few different lengths as well as some extra retaining pins. The retaining pin on the right is the factory pin and is a round shank with a square top. This doesn’t allow for a close proximity connection. At Tractor Supply, we found retaining pins that are ¾ round with an offset square top that will allow you to install the pin right up against the connection point. We grabbed a few extra to have them on hand as well. You never know when you’ll misplace these, and you have to have them to operate safely. They are very inexpensive, and it just makes sense to have extras on hand.
We hope you guys and gals found this post to be helpful and entertaining. Be sure to check back soon as we keep moving forward on the property and share a some really cool tips we have learned along the way. Thanks for stopping by!