


A mountain of rope isn’t much help, if you don’t know how to tie knots and lashings. Our ancestors have been roping things together since the remote past, and to this very day, knot tying is an invaluable skill set for survivalists and outdoor enthusiasts. There are hundreds of different knots you could learn, but I find that I only use just a few on a regular basis. These are some of the most reliable and handiest knots and lashings that we can use in the wild.
Square Knot
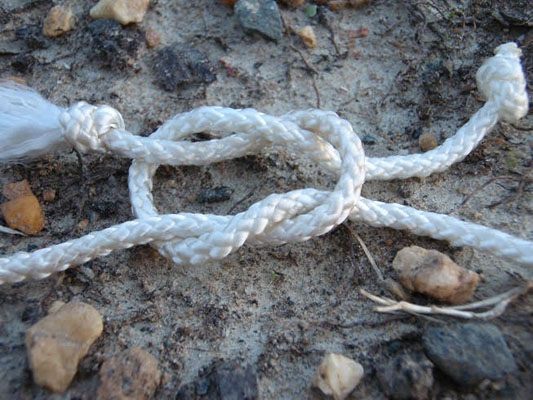

When you need to connect two separate lines together (or just the two ends of the same rope), the square knot is a dependable choice. It’s very useful when rejoining cut pieces of rope back together for a longer rope, or when you are tying a rope around something (like a bundle of firewood). The square knot is the right choice when the two ends that are being joined are the exact same diameter and texture. This knot is often confused with the “granny” knot, but it’s fundamentally different. Start out like you’re tying shoe laces, by lapping one line around the other. Next, tie an overhand knot so that the finished knot lies flat and the ropes are parallel (if you tied a “granny,” the loose ends will naturally stick out perpendicular to the main lines). Another way to view this knot is a pair of rope loops that grab each other. Make sure that both loose ends are on the same side of the knot, and you’ve done it perfectly!
Sheet Bend
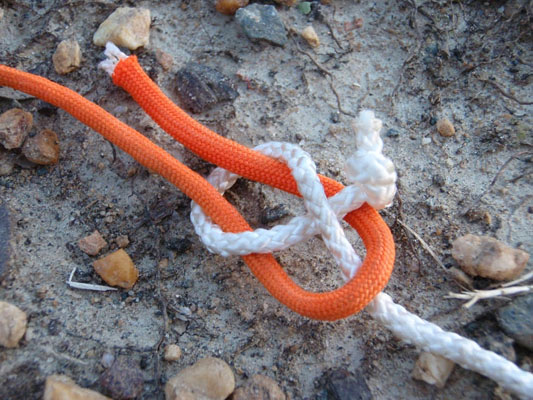
This strange knot is perfect for joining dissimilar ropes and materials together. It’s also the best knot for joining together different thicknesses of rope (unreliable with most knots).To tie a sheet bend, take the thicker rope and curve it into a fish hook shape. Pass your smaller rope through the curve of the “fish hook” from behind, wrap around the entire fishhook once and then tuck the smaller line under itself. This knot is almost a square knot and would be if you passed the tag end back down through the “fish hook.” But by keeping the tag end under itself, the knot will work on different diameter materials. For added security, I typically tie an overhand knot in the loose end of the rope that threads through the fish hook. This way, if the more slender line starts to creep around the bigger line, it will hit the overhand knot and stop moving.
Bowline
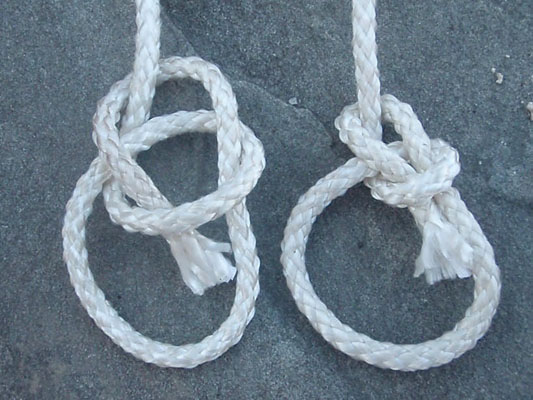
For a fixed loop at the end of a rope, the bowline is a great choice. Many folks teach this knot by telling a story about a rabbit coming out of a hole, going behind the tree, and so forth. This is one of the hardest knots to explain in words, and it often takes people several tries to get it right – but it really is worth the effort. One of my mentors once said, “…if you get to the end of your rope, tie a bowline and hang on!” Good advice! To tie this odd knot, form a loop on top of your rope near the end. Thread the free end of the line through the loop from behind, leaving a loop roughly the size you will need. Next, bring the end of the rope behind the standing line (this is the part where the “rabbit” goes around the tree). Bring the end of the line down through the original loop, and pull the standing line (the long end of the rope). If you did it right, the second loop you made will become your fixed loop (neither closing or opening when pulled).
Timber Hitch
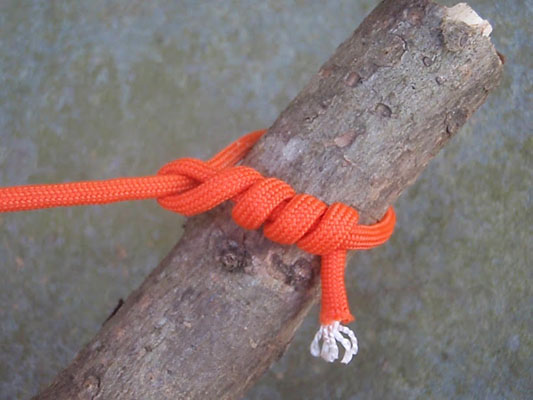
To tie a rope to a log or post, the timber hitch is a solid way to secure a line to a cylindrical object. This hitch has been used when mules and horses once pulled logs out of the forest, and it’s a handy way to begin a diagonal lashing. To tie this hitch, pass the free end of the rope around the log, post or tree. Wrap the free end of the rope around the standing end of the rope. Finally, spiral the free end of the rope around itself four or five times. Once you tighten the timber hitch, loop and wraps will pull tight and secure the hitch. As with the sheet bend, add an overhand knot to the loose end of the rope for an “insurance policy” against unraveling.
Taut Line Hitch


For adjustments on a tarp shelter or rain fly, the taut line hitch is a knot that can act like a metal or plastic sliding lock to tension or loosen your line. As long as the hitch carries a load under tension on the “taut” side, the hitch will grip. And if you take the tension off the line, you can slide the knot back and forth to tighten or loosen as needed. When tying the taut line hitch, first wrap around the item (such as a tent stake). With the free end of the rope, wrap around the line twice, going in the direction of the stake twice.Then bring the free end of the rope over the two wraps, towards yourself. Spin the end one time around the rope and cinch these wraps down tight. You should have three wraps in a row. Tighten everything and pull on the standing line (the load bearing part). If you did it right, the taut line hitch should grip the line that’s under tension.
Square Lashing
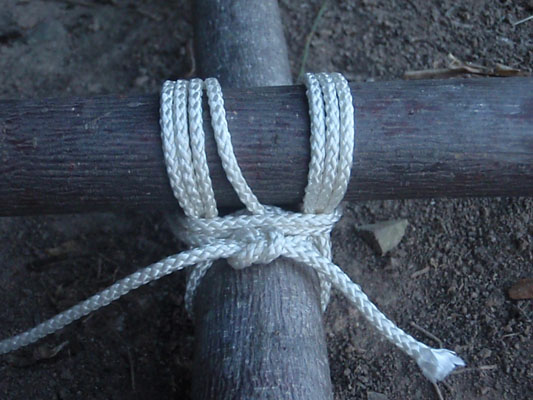
Lashings are one of the places where we really put those knots to work. A lashing is the way to fasten together things with rope (rather than nailing or screwing them together), and the square lashing is ideal for fastening together poles that are perpendicular. With a tight square lashing, you can build shelters, furnishings and many other camp constructions. Start by tying a line to one of your poles, near the place where they cross.
Your initial knot can be a clove hitch (popular among Scouts), a timber hitch, or my favorite – the square knot. I prefer to leave several inches of rope dangling free to tie back to this knot when terminating the lashing, but most other people just tie a second knot to finish the hitch. It’s up to you. Once you’ve tied to the first pole, wrap your line around the two poles where they cross. As you face the lashing, you’ll need to wrap under the lower pole and on top of the top pole.
Wrap around the items, three or four times. This part of the lashing is called the “wrapping” and it should be pulled tighter with each wrap. The next step is to wrap between the poles, biting onto the previous rope wrappings to tighten them. This part is called the “frapping.” Once you have frapped the wrappings, tie the end of the line to one of the poles to secure the entire lashing. Or do as I prefer, tie square knot between the tag end of the first knot and the end of your line.
Diagonal Lashing
With a minor change of the wrappings and frappings, you can take what you’ve learned with the square lashing to connect poles that are not at right angles to each other. You won’t need this lashing as often as the square lashing, but when you have to lash crosspieces at an angle, this is the right lashing for the job. Start out by tying a timber hitch around both poles, pulling them tightly together. Wrap four times vertically around the poles, then make four wraps horizontally around the lashing. Make several frapping runs between the poles, to tighten the wrappings, and finish the lashing by tying to the tag end of line to the poles (or to the tag end of the timber hitch that started it all).