


Hey guys Brain & Terry here! Today we are going to work on getting our driveway installed. Until now, we have had a dirt drive back into the property. On good days this was fine, but if it were really dry or we had lots of rain; we ended up with a dust bowl or a mud pit, haha. More often than not, we had tons of rain so we would have a six-hundred-foot-long mud pit that we couldn’t drive on until it dried up. This was always a setback when we wanted to be working on the property.
Getting the driveway in has definitely been one of the more difficult tasks for us. Since we aren’t “builders” by trade, with lots of work for grading companies, it was difficult to get someone to come out and do the work we needed. Several people had told us they would, but either canceled, kept putting us off, or just plain didn’t show up. It was disheartening to say they least. We finally found someone that was honest and up front with us about his schedule. Not only did he actually show up, but he also called and said he’d be a few days early! It was a huge relief finally having this come to fruition.

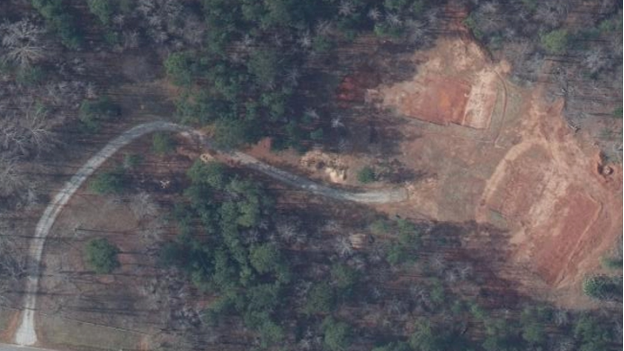
Our driveway is pretty straightforward. It’s about 12 feet wide with a couple of turns in it and the total length being roughly 600 feet long for the portion he’d be doing for us now. The only “issue” we had was a low spot in one of the corners that would require a slight banking of the drive and installation of some drains.
We had a minor miscommunication and didn’t establish for sure who was going to pick up the 12-inch drainpipes for a corner in our driveway. So, when he showed up and they weren’t on his truck, we got the specs for what we needed and managed to find two across town at a supply house. We definitely turned some heads driving across town with two of these pipes tied down on top of our short bed F-150, haha.
The pipes we went with are a molded 20 feet long polymer, 12 inches in diameter, corrugated on the outside, and smooth wall on the inside. The other option was concrete that are shorter, MUCH heavier, and require chinking at the joints that, if not done properly, can lead to leaks and washouts around the pipes.
While we were gone getting the pipes, he got started with the main grading using his giant Caterpillar bulldozer. It made quick work of the drive we had laid out for him. He put a nice swell down the middle to help the drive drain water to the sides and a small gutter on each side to let the water drain with the natural slope of our land. It’s truly amazing how quickly the right piece of equipment can get a job done. We would have been days, if not weeks, using our little tractor to do this, haha. This is one of those times that it is worth paying someone to do a job for you.
Next up, we laid out the exact location for our drain to go in and he switched over to his skid steer with a custom bucket he made for digging stumps, trenches for drains, etc. This bucket really made the job go quickly and was the perfect size for these 12-inch drains.
One thing to keep in mind is that water has to run downhill. At first, the trench looked like it was running downhill, but it was deceiving because of the lay of the land. Once the grader got out his laser level, he could clearly see it was actually going uphill, haha…that would have been fun on the first big rain!
Once the pit was dug deep enough, and with the proper slope, we installed the drains and he started covering them up.
Next up, we had to move quickly to get ready for our gravel delivery!
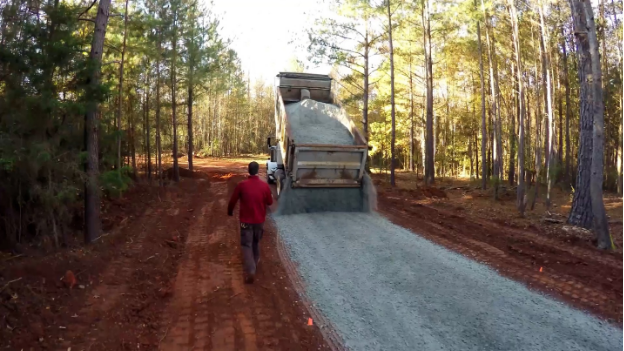
It took four truckloads of gravel, about 80 tons to cover our drive. It’s pretty neat how they disperse it from the truck. They have links of chain holding the rear hatch closed. Instead of fully opening the hatch, they can adjust the links of chain out and limit how far it opens. They know roughly how fast different mediums (gravel, dirt, sand, etc.) will come out based on how far out the hatch opens. So, they adjusted to a set length to give a good spread of gravel over the width we wanted. This made it possible for our grader to come behind them and smooth out the gravel with ease.
To do this, he used another implement he had constructed. It’s much like a land plane. Land planes are great tools to use when leveling or smoothing a surface like a gravel driveway, a garden, or any area you want smoothed out (like the dirt below our drive before the gravel went down on top). You can also get land planes for the 3-point hitch attachment on a tractor that makes your already capable tractor even more versatile. They key thing to remember when running a land plane is that you want work slowly.
After a little while running back and forth on the driveway smoothing and working the edges, the job was complete, and we had a driveway! This was definitely a huge step forward for us. We no longer have to wait for the driveway to dry up after days of rain. We can finally get into the property with ease, no matter the weather, and get started moving forward with our homestead.
We hope you guys and gals found this post to be helpful and entertaining. Be sure to check back soon as we keep moving forward on the property and share a some really cool tips we learned along the way. Coming up, we’ll be working with our box blade to prepare for getting water on the property. Thanks for stopping by!