


Get uncensored intel and commentary from Survival Dispatch News
Subscribe to our RUMBLE channel

I’ve had a rough history with my various winter survival challenges. The first attempt was an eye-opening experience. I had been planning this challenge all year, then it turned out to be the coldest week to date. I headed out early in the morning as the snow came down steadily and started by working on my shelter during the day. My plan was to build a debris hut attached to a dome shelter. There would be a fire in the center of the dome. I could comfortably sit by the fire, but would scoot back into the debris hut when ready to sleep. Things didn’t work out as planned.
Unfortunately, I had planned a shelter design that was much too large and elaborate. Keep in mind that this was a long time ago and only the second solo survival challenge I’d ever attempted. The temperatures had started out in the low 20’s, and the wind blew hard most of the day. I cut down maple poles for the framework of the shelter and broke off juniper branches for the insulation. With only an hour of daylight left, I was forced to stop building and try to get a fire going. All of the wood and tinder were wet from recent rain and snow. After an hour of trying, it was dark and I had no fire. I knew it would be a rough night.
That night the temperature dropped to -1°F with a wind chill of -20°F. The walls of the shelter were too thin. Plus the overall structure was too large to block the wind or provide any insulation. There was no time to build a bed, so all I could do was wrap up in an emergency blanket and pray. I ended up tapping out around 1:00 am when my body temperature dropped to a dangerous level. Early symptoms of hypothermia were apparent, so I headed to warmth.
A week later I tried the challenge again. The conditions were similar and it was successful only because I laid by the fire all night. My shelter failed again. My hands and feet tingled for at least two weeks after this challenge. In this article, I will cover how to build the ideal emergency winter shelter. I’ll also describe a challenge from January of 2017 in which it worked exactly as planned.
Winter Shelter Basics
Simple is Better
As you can see from the above anecdote, a simple shelter design is always a good idea. The more complicated it gets, the less time you’ll have for building up insulation or other tasks. In addition, a more complex design means more materials must be gathered. More materials also means more calories that must be expended. There are really only three shelter designs that I use anymore. These are the lean-to design, the debris hut design, and the snow cave. This article will cover a version of the lean-to design because we’ll be discussing an option with a fire. Debris huts are designed for scenarios without fire. Snow caves are designed for scenarios without fire or debris but with deep snow.
Small is Better
This is a very simple principle that many people forget. Every additional cubic foot of air inside of your shelter will reduce the average temperature. In the winter, you want your shelter to be as small as possible while still allowing for the following two things. First, you need a bed that is off of the ground. Second, you need to be able to get in and out without knocking it down.
Build a Bed
In the winter, it’s imperative that you get off of the ground. The frozen ground will draw all of the warmth out of your body unless you have at least four inches of compacted insulation underneath. This means that you may have a pile of leaves that’s a foot deep, but they might compress down to four inches when you lay down. Being less than four inches from the ground won’t cut it. You can also use pine needles, spruce boughs, or any other dry material that will help hold air and create a barrier. You need to have a barrier between you and the ground. An ideal depth is more like eight to ten inches of compacted insulation. If you’re short on debris materials, build a frame and fill it with loose debris. Final step is to create a soft layer on top.
Pay Attention to Your Surroundings
Take your time when you start looking for a location for your winter shelter. I always like to consider at least three spots before making a final decision. A level spot, proximity to water and food are always important. However, it’s really important in the winter to pay close attention to the wind and sun. You want as much sun as possible beating on your shelter site, so the South or West side of a hill is best. As for the wind, try to find a spot where the terrain or the trees will help block it. Finally, be sure you are in close proximity to a large amount of dry firewood. Most of this should be up off of the ground so the interior wood is drier.
Use Lots of Insulation
When building a shelter, you always want to have at least six inches of insulation on the roof. However, with wet or cold conditions you need much more. I have built shelters with four feet of leaves on top. Take the time to keep piling on the dry debris so that your finished shelter will hold in heat and ward off rain.
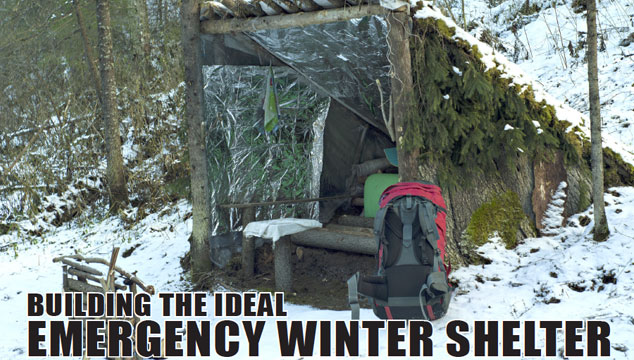
Winter 2017 – The Perfect Winter Shelter
Well, here we are. After multiple winters of freezing my tail off, I was committed to finding the perfect shelter setup. It needed to actually be warm and let me sleep in sub-freezing temperatures. What I came across was a design called a super shelter. In addition to the basic features of a good lean-to, this shelter design uses reflective and radiative principles to trap heat inside of your shelter. Here are the additional features that must be added to your lean-to:
Emergency Blanket on the Inside
Attach an emergency blanket on the inside of your roof with the reflective side facing in. In addition to reflecting heat back towards your body, it also adds an extra layer of water and wind protection. I prefer to use a thick, tarp style blanket with eyelets on the corners. These are extra durable and easy to attach.
Clear Plastic Sheet Over Entire Shelter
This step is absolutely vital. As heat from your fire radiates towards the shelter, it will pass through the sheet but become trapped inside. The plastic covers the entire shelter including the entrance. It will hold warmth plus keep out the wind, rain, and snow. This should go over your insulated roof if possible. I like to use a thicker sheet to ensure that it doesn’t melt.
Body Length Fire
In order for this shelter design to work properly, you need visible flames down the entire length. The fire should be built just far enough away from the plastic that it won’t melt. I like to stack four or five big logs at least six feet long. Then I stuff any gaps between the logs with debris like leaves or dirt to control the air flow. Finally, I build three upside down style fires on top at the head, feet, and middle. Simply layer smaller, shorter logs and fill in the gaps with more debris.
Alternate the direction of the logs by 90 degrees for each layer. Then build a teepee on top and light the tinder bundle inside. The fire will slowly burn from the top down and will eventually catch the body length logs on fire. If the flames die down to coals only, you’ll need to add more wood to get the flames going again. However, if you build this design right it should last most of the night. You can also add a heat reflector to the opposite side of the fire. This is just a wall or emergency blanket that will bounce heat back to your shelter.
How It Worked Out
My plan for this challenge was to head out on the coldest weekend of the year again. However, this time I would be on my uncle’s property in the Ozark Mountains. I would be hiking several miles to the opposite side of our hunting property to find a good spot for a shelter. I brought three preserved deer hides along with the plastic sheeting needed for this shelter. My gear along with the internal frame pack weighed almost 50 pounds. I had done some serious hiking on my challenges but never with a pack this heavy. After making it deep into the wilderness, I ran across a spring that was surrounded on three sides by large bluffs. There was a large pile of debris nearby that would help block the wind. It would also provide a good amount of firewood and building supplies.
I hydrated at the spring and started building with a basic framed lean-to. Then I immediately started work on my bed. I’m a big guy, so decided to build a bed frame and fill it with leaves. Then I layered the deer hides on top to provide additional padding and insulation. It was by far the best and most functional bed I have made to date. Then I cleared out the area for where the fire would be and brought over some logs. With the few hours of daylight left, I hung up the emergency blanket under the frame, packed in roof insulation, and stretched out the clear plastic on the outside. My shelter was built so it was time for the fire.
Fire
I gathered the tinder and kindling needed and took the rest of my daylight to build the fire structure. Then I dug out the ferro rod from my pack and lit each teepee one by one. Within a few minutes I had three fires going and took a minute to hydrate again. There would be no food that night, so I would have to do some hunting the following morning. After cooling down from all of this work, I crawled into my super shelter. To my surprise, I was sweating within minutes. I made some adjustments to my clothing so I could regulate body temperature. I realized my new home was surprisingly comfortable. By 10:00 pm I was sawing logs which honestly never happens on survival challenges, especially in the winter.
Reflection
There were a few downsides to this particular design. I had to get creative to figure out a way to keep my door sealed. There was a nasty draft at my head and feet, but not enough to keep me from sleeping. The other issue is that your fire design must be perfect or you’ll wake up shivering. As soon as your flames die down to coals, the temperature inside the shelter will plummet. The temperature was 5F that night, and it felt like my shelter dropped from 80°F to 5°F in about an hour. I needed to get up and put wood on the fire before dawn, but didn’t want to leave the shelter. That being said, it was the warmest winter shelter that I’ve ever experienced.
Final Thoughts
I woke up on my second day highly impressed with the night I had experienced. While it takes a few additional supplies to work, this is completely worth it when facing sub-freezing temperatures. The extra effort was definitely worth it to find a shelter that worked. I have a new idea for a sub-freezing shelter this winter, and am looking forward to seeing if anything can top the super shelter.
=====
Become a Survival Dispatch Insider …
We bring together survival enthusiasts and preppers to share skills and knowledge, so you can enhance your preparedness for emergencies and ensure the safety of you and your community.
The Results You’ll Get …
Our community, courses, and memberships are pretty special. We focus on the ways it will make a huge difference in your life.
Here are a few of the things you’ll be able to do as a member of Survival Dispatch Insider …
1) Improve your emergency preparedness by learning survival skills and strategies from experienced preppers.
2) Build lasting connections with like-minded individuals that share your passion for safety and readiness.
3) Access a wealth of knowledge and resources to assist in protecting you and your community during unexpected situations.
Click HERE to get started.
=====