


Preppers know it is crucial to have the knowledge about how to safely can and preserve food. It can help you save money on your prepping by taking advantage of your ability to grow a garden and canning the surplus. It’s a quick, inexpensive way to bolster your stockpile. Buying in bulk is one way to save money and can bump up your stockpile with very little monetary investment.
It can also prove to be useful after a major disaster. Imagine life after a disaster and you need to be able to preserve your food for a long winter. Remember, you won’t have a grocery store to run to in the middle of December. It’s going to be whatever you have in your stockpile or what you can save from summer crops.
Canning is fairly easy. There is an initial investment to get the right equipment. You can buy secondhand and save a boatload of money.
Equipment for Canning
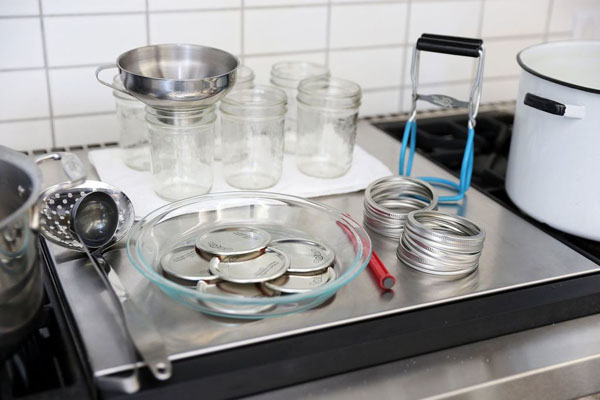
There are some absolute necessities that you need and a few extra tools that can make the job easier in general.

- Pressure canner—this is an absolute must-have to preserve vegetables, stews and meats. The temperature needed to kill all bacteria and safely store food cannot be achieved without a pressure canner.
- Jar tongs—not an absolute necessity, but they do make the process safer to add and remove jars.
- Water canner—helpful, but not a requirement. A water bath canner is essentially a large stockpot with a rack on the bottom. You can buy a rack separately and use your own large pot.
- Jars—must have. You can certainly buy used, which is great. Jelly jars and other used jars may not be suitable for canning. They need to have the right size “mouth” that will fit the lids you will need to buy. Wide-mouth jars are ideal for things like meats, stews and larger food items. The wide mouth makes it easier to pack and easier to pour out when you’re ready.
- Bands—must have. They come in regular and wide-mouth. If you buy new jars, you will get bands. Buying used jars, you may not get the bands. You can buy them separately. If you have more jars than bands, a trick many people use is to go through the canning process with the bands and later remove the bands before storing the jars in the pantry.
- Lids—must have. These are sold in boxes. It is a wise idea to stock up on these now. You do not want to try and reuse lids. They are cheap enough that you don’t need to take the risk of a gummy seal being bad or some kind of bacteria being harbored on the lid.
- Jar ladle—when you are dealing with soups or jams, this is going to save you a lot of hassle and prevent liquids from spilling all over your counter.
How to Can
Canning is a lot like cooking. Everyone has their own way of flavoring their food. That part is up to you. You can experiment with some of your own recipes or keep it simple with nothing more than plain water. There are some canning basics that everyone needs to follow to ensure the safety of the food you put on your shelves.

- Have all of your supplies in the kitchen before you ever start the canning process. In many cases, the recipes have strict timing requirements. You can’t run to the store to get sugar or lids. Inspect your jars and look for any stress cracks. Once those jars go in the canner, the stress cracks are going to be exaggerated and there is a good chance the jars will break, ruining the food you are trying to preserve.
- Disinfect your jars and bands by boiling them in water. Set them aside so they are ready to go.
- If you are canning fruits and veggies, pick the best of the best. They should be almost ripe or right at ripe. You don’t want anything that is soft or on the verge of molding. You do NOT want to put that into your jars.
- Go through the process of cleaning and hulling your produce. You’ll need to complete the blanching process which is essentially killing any bacteria on the produce, but not actually cooking the food by boiling it in plain water.
- Add your fruits, veggies or whatever soup, stew or meat you are preserving to your jars.
- Use a damp towel to wipe off the lids. The rim of the jar has to be clean to allow the lid to properly seal.
- Place a clean lid on the jar and screw on a band.
- Fruits and jams can be put into a water bath canner and processed for about ten minutes. All other food items will need to be processed in a pressure canner. Processing times depend on the food. You can expect times to range from about 40 to 60 minutes.
- Once the processing is done, use jar tongs to remove jars from canner. Place on the counter and allow to rest. You’ll probably hear some popping sounds as the jars cool. This is a great sound and means the jars are sealing.
- Check the seal on the jars by pressing on the lid. If it bounces, it didn’t seal. It should be sucked down. It can take a full twenty-four hours for the jars to seal.
- Label your jars by writing on the lids or adding a label to the jar itself.
Canning is a great way to save money while giving you complete control of what your family eats. You’ll have the option of selecting the best produce and flavoring the foods the way your family likes.